Learning How to Git: Creating Your First Commit
This story is targeted for people who never used Git before and want to learn it through simple steps. For the intermediate Git, tutorials will be followed later in the future.
Yesterday, we have talked about the basic concepts in Git. But, concepts are useless without trying it. So, today we are going to make our first commit in Git.
Prerequisites
This story assumes you have installed Git on your system and you have configured the first time Git Setup about the user’s name and email. For folks with Windows if you haven’t installed it, you can access it here and if you haven’t configured the user’s name and email and don’t know where to start you can read this article here.
Terminal
Fire up your favorite terminal (sorry GUI lovers). For people who use Windows, I’d recommend using Git Bash for Windows, Cmder, or Bash on Ubuntu. Whichever you finally choose is the same. I’m myself is using Cmder.
Let’s first try to check whether you have installed Git correctly or not and check which version you have installed. It is pretty easy, just type git —-version (it is double dash), and it will return the version of the git that have installed on your PC.

Git Status (First Part)
If I count all the git commands I have used so far. Then Git Status will be the first one on my most frequently git command list. git status really is useful, it is designed to check whatever state your current Git project. The most useful one it’s because it is listing all the differences between the working directory to the latest commit. It can shows which files added, which files added but not staged yet (we will talk about staging later), which files were modified, which files were removed, and so on. Let’s try to execute git status.

Uh oh. Don’t worry, we are doing just fine. Let’s check the error. If I’m going to translate it to more friendly words it is actually telling us that the current directory we are happened to be is not configured with Git yet. That’s fine, we will make this directory a Git repository.
Git Init
Okay, so in my own project, I’m starting a project with no files at all in the folder. Actually, you can initialize a Git project in a folder with a lot of files of your project. It is just a notice so that you are not surprised when what our terminal showing is different. Let’s run the git init command.

Okay, so that’s actually all you need to do to initialized an empty Git repository. To confirm it, let’s run git status.

Yeah, now our folder already initialized as a Git repository. Now we can do all the git stuff in this folder. If you start with a folder with a lot of files already, it is time to move to the next part.
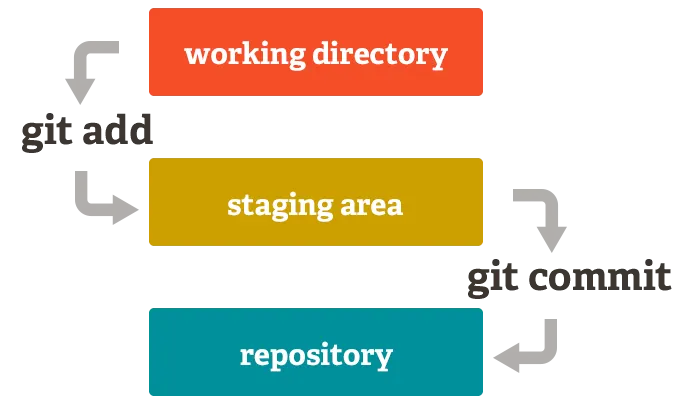
Git Add
After you have been working on with your project, your files, so on and so forth. It’s time to track and add files to the staging area. Let’s say now we add a file called README.md, and now we check it using git status. The terminal will show something like this.

It says that the README.md is not tracked yet, thus first we need to track it by using git add command. To add a certain file, we can run git add <filename> command. So, in my case that would be git add README.md.

What if we have a million files at once need to be added to the staging area? We can use a much simpler command that is git add . (notice the dot after the add command). Those . simply stating that it will add the whole current directory to the staging area. In real life, we are much preferred to use the git add . command.
Git Commit
After we add those files to the staging area, then we can create a checkpoint called commit. As I stated in the previous story, commit is usually created after we are finished working on a certain feature or fixing a certain bug. These commits can be used to track which features added on which commits and by who, so we can easily track or even revert the whole commit if something bad happened to the source code.
To add a commit we can use the git commit -m "<commit message>". The -m means that we are going to add a certain message, one thing to remember is that the commit message are limited to 50 letters. If you have to write it more than 50 letters, there will certain ways to accommodate that will be covered in future stories.
In this example, we are going to create a “hello world” commit in Git. We are going to make a commit with message “Initial commit”. So, we are going to write git commit -m "Initial commit".

Yeah, now we have created our first commit in Git!
Git Log (Bonus)
To easily check the history of our commits, we can use git log command. If we try to run the git log in our project, then it will show something like this.

As we can see, there exist the history of our commit with a message “Initial commit”.
Wrap Up
Today we have learned about how to start with Git by creating an initial commit. The next story will be about the remote repository and how to sync between local repository and remote repository. Hopefully, you will understand Git easier after reading this story. Thanks for reading!